How to Cut Plywood Without Splintering: A Workshop Guide

Plywood splinters because the saw teeth lift the face veneer as they exit the cut. That is the entire problem. Every technique in this guide exists to stop that one thing from happening.
We have been cutting sheet goods in our Lahore workshop since 1974. Solid sheesham and walnut are what we build furniture from, but plywood still earns its place in a serious shop — cabinet backs, drawer bottoms, carcass panels, jigs and templates. When it shows, it has to be clean.
On cheap commercial ply, tear-out is an annoyance you can hide. On a hardwood-faced panel or Baltic birch, it is a mistake that follows the piece for its whole life. Getting it right the first time costs nothing but attention.
Four things decide whether your cut splinters or comes off clean: blade choice, face orientation, scoring, and support. This guide covers all four, tool by tool.
Why Plywood Splinters
Saw teeth cut in one direction and exit through the opposite face, lifting fibres as they go. That lifting is tear-out. A face veneer is thin — often under a millimetre on imported hardwood-faced sheets — and it has nothing holding it down at the moment the tooth breaks through.
The exit side changes depending on your tool. A circular saw exits through the top face. A table saw exits through the bottom face. This is why "cut face up" and "cut face down" advice contradicts itself all over the internet: both are correct, for different saws. Advice that does not name the tool is worse than no advice at all.
Finish-grade material shows tear-out far more than construction ply. Hardwood-faced panels have thinner veneers that splinter more visibly. Baltic birch has many thin plies, which means more veneer edges exposed at every single cut.
In our climate there is one more factor worth knowing. Sheets stored flat in a humid Lahore or Karachi summer and then cut in a dry, air-conditioned room will move slightly as they cut, and a moving sheet tears. Let a new sheet sit in the room where you will cut it for a day before you touch it. It is free, and it prevents a problem you cannot fix afterwards.
Choose the Right Blade First
Blade choice is the highest-impact variable in this entire guide. Most tear-out traces back to the wrong blade, not the wrong technique.
Tooth count matters most. More teeth means smaller chips and less veneer lifting on exit. For construction ply, a 24–40 tooth blade is fine. For hardwood-faced plywood, Baltic birch, or any panel that will be seen, use 60–80 teeth minimum. Pre-laminated sheets want 80 or more.
The grind matters too. Look for ATB — Alternate Top Bevel. ATB teeth are ground to slice across wood fibres cleanly, which is exactly what you are doing every time you cross a plywood face veneer. A flat-top grind will chop where an ATB slices.
Quality matters as much as the number. A cheap 80-tooth blade still tears out. Carbide-tipped teeth hold an edge far longer and cut cleaner than plain steel. And keep the blade clean — pitch and resin build-up causes burning and tear-out even on a blade that is technically sharp. A few minutes with a resin cleaner restores a blade most people would have thrown away.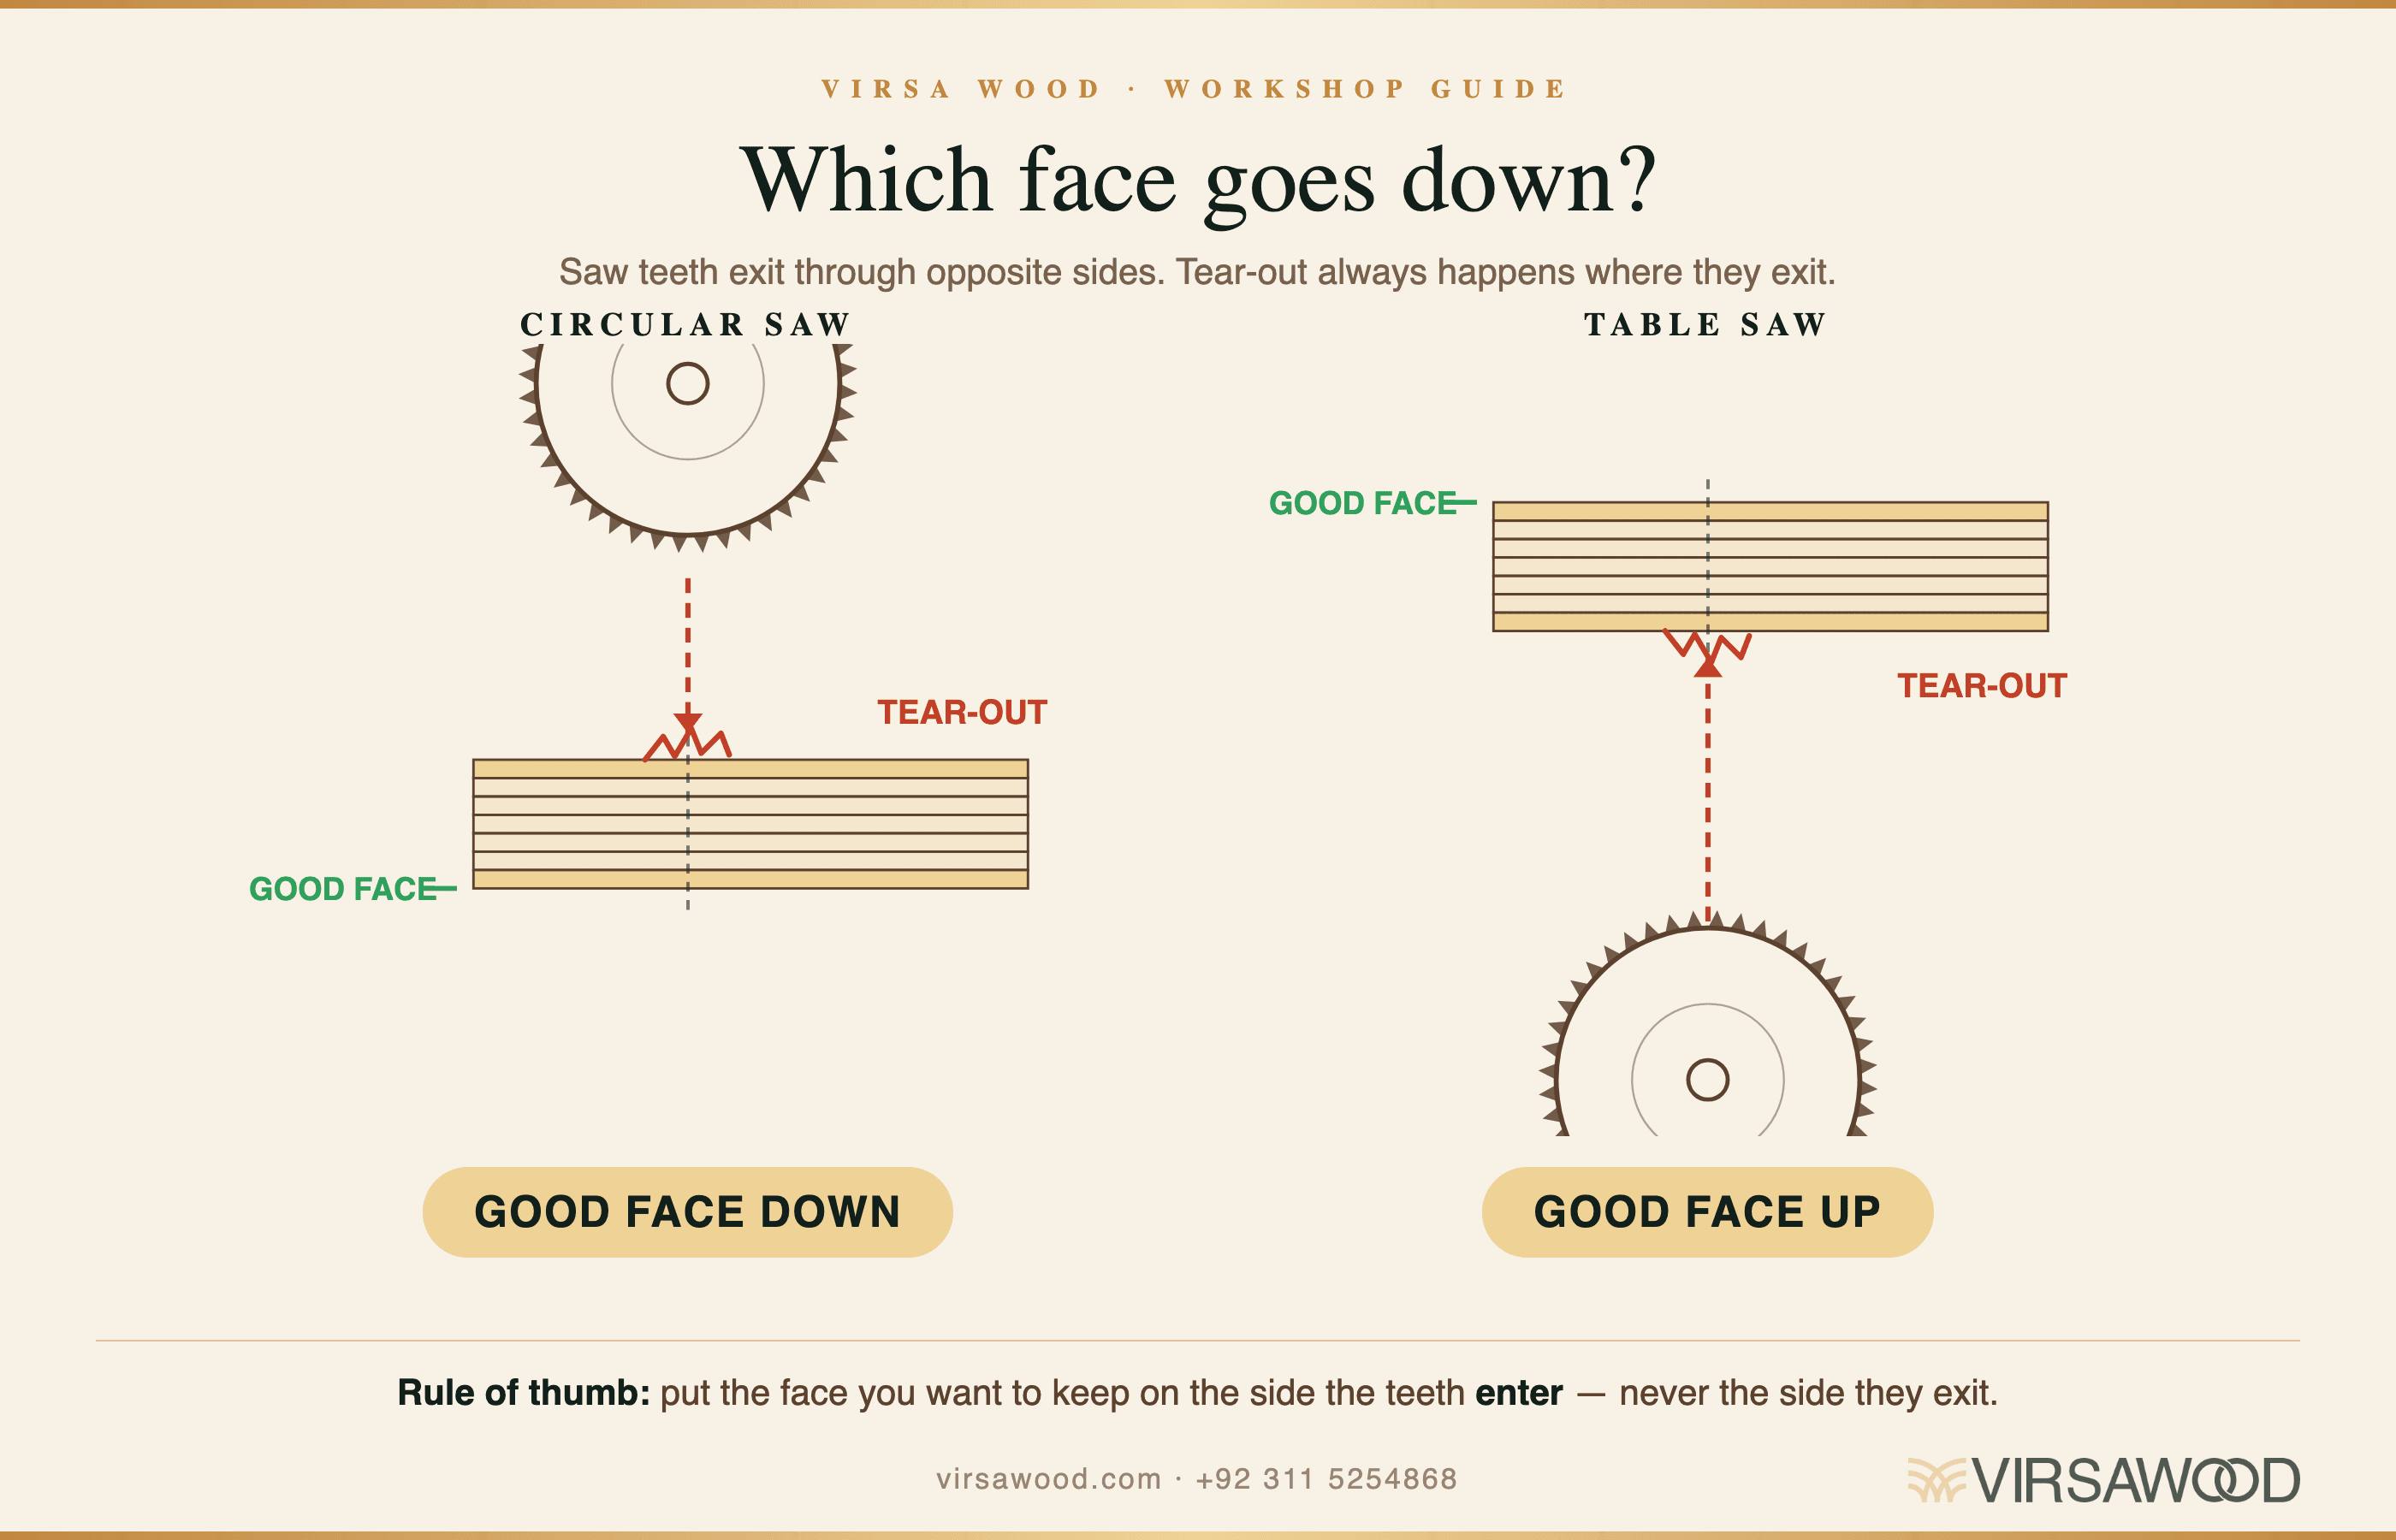
Quick Reference: Blade by Application
Application Tooth Count Notes
Commercial / construction ply 24–40 Speed over finish
Hardwood-faced plywood 60–80 ATB grind preferred
Baltic birch 60–80 minimum 80+ for visible faces
Pre-laminated / melamine board 80+ Protects the existing surface
Workshop note: if you own one blade for sheet goods, make it a 60-tooth ATB carbide. It handles everything above respectably. A dedicated 80-tooth is a second purchase, not a first.
Score the Cut Line Before You Saw
Most beginners skip scoring. Most carpenters with grey in their beards do not.
Scoring severs the veneer fibres along the cut line before the blade arrives. Severed fibres cannot be lifted, because they are already cut. It is the single most effective technique for eliminating tear-out on the exit face, on any tool.
Scoring with a utility knife
Clamp a straightedge firmly along your cut line. Run a sharp knife along it two or three times — enough to cut cleanly through the face veneer, not to gouge the core. Make your saw cut just inside the scored line, on the waste side. The blade then exits into veneer that has already been severed, with nothing left to lift.
Scoring pass with the saw
Set the blade very shallow — just kissing the surface, roughly 1.5–3 mm (1/16"–1/8"). Make one slow, deliberate pass along the line. Then raise the blade to full depth and make the real cut. This works on both circular saws and table saws and adds about two minutes to the job.
Score on the exit face. That is the top face on a circular saw and the bottom face on a table saw.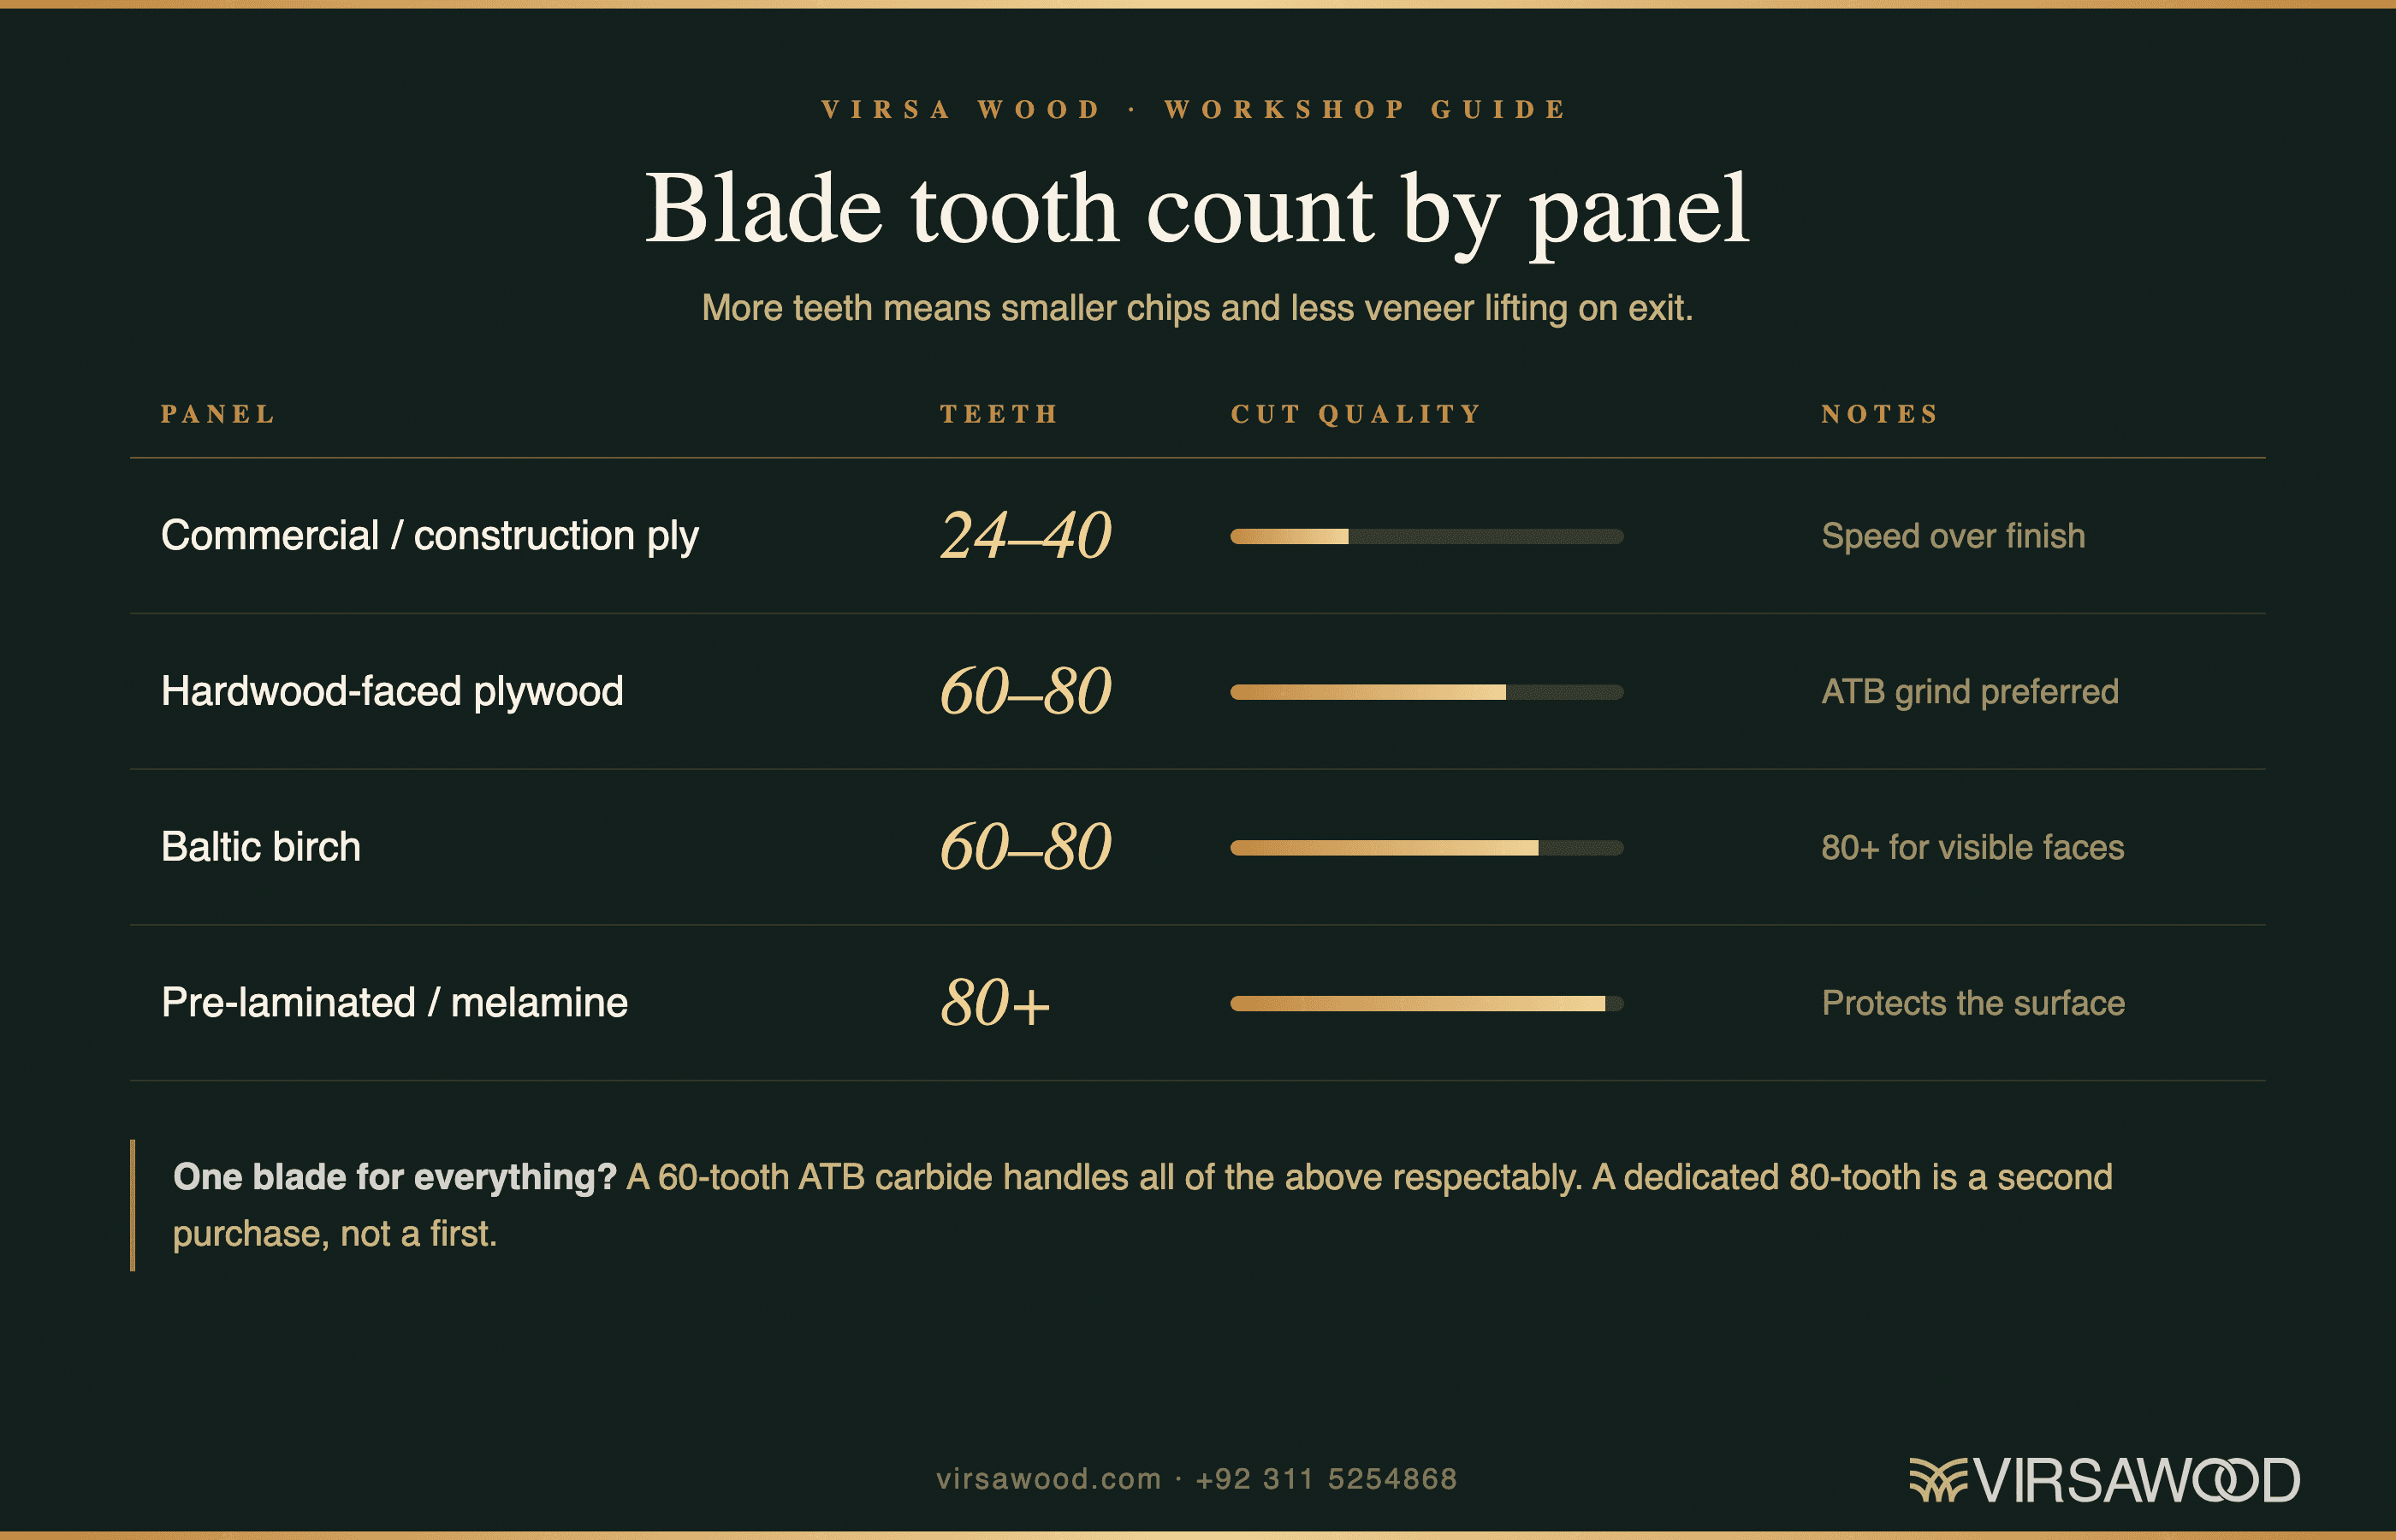
Enjoyed this?
Follow Virsa Wood on Google
Mark us as a preferred source and our stories on wood, craft and interiors will show up more often in your Google Search results.
Add as a preferred source